Labels

Showing posts with label arts and crafts. Show all posts

Wednesday, 12 December 2012

Personalized Santa hats

I have a confession to make: I have been a very bad crafter.

I have not made one new item in the last two weeks. Ideas play in the mind but non-crafting work keeps pushing them back.

But I did have time to personalize these two Santa hats for the new men in my life :)


I've been looking for letters or colored felt that I can stitch on these Santa hats but couldn't find any. The felt I found were not very cheerful in color (black and dark blue), guess the shop was out of stock. So when I made a quick stop to Fida's in Satwa last week, it was a nice surprise to find this cute chequered green ribbon.

If you don't know how make blanket stitches, I found this cool vid that shows how:


I used white thread and blanket stitches and tadaaa -- Santa hats with initials! I'm not great at sewing but I love the final look. What do you think?

Sunday, 25 November 2012

Crafters of 10a Alabama

In my 10 days in Manila, I had the wonderful opportunity to check out the 10a Alabama Arts & Crafts Fair. 


My friend Betsy is a regular, she sells their hand made items labeled Orig Kami Handmade Novelties by Alejo-Aytin such as handpainted eggs, bottles and wooden spoons together with handpainted jute bags and other hand painted wooden mediums made by her dad and sister. He husband also offers a great collection of origami earrings. 
Orig Kami Handmade Novelties by Alejo-Aytin
I'm a great admirer of Betsy's work since we were in college. I have commissioned her before for a painting of daisies which I gave to my godmother who collects daisy designs, and more recently, I have commissioned painted bottles which were supposed to be given away as wedding favors (long story why it's "supposed to be" but that order is on hold for now). Also in my possession is a lovely reproduction of Gustav Klimt's The Kiss lovingly done on an antique canvas, which she also painted. 

Whenever I go home in Manila, we make it a point to meet at least once, so it was nice being able to surprise her by turning up at the fair. As usual, she wowed me with her creations and her long list of "to dos". Evidently, she doesn't have the time to finish up the orders that are still in queue - way to go Bets!

It's always great meeting up with her, I always end up inspired and motivated to explore my own art. Christine, another college friend, was also there hanging out. She's into make-up now, both teaching and make-up service, and she can easily talk her way around brushes, concealers and more. It's been so long since I last saw her we just gabbed as if to fill in the years in between.

But enough of that for now, here are lovely finds in 10a Alabama, enjoy!


*Note: The watermarks on the photos are only there to indicate that these photos are mine. The products and brands featured in each photo are of the respective artist. 

Saturday, 27 October 2012

Make Your Own Cool Wall Clock

Cleaning up my hd is so harrrd to do... (can you hear a tune with that?). While I'm waiting for the trash to empty, I'm reorganizing and sorting my folders. Got reminded of this mini tutorial I wanted to post a while back - cool wall clocks! 

When I moved to a new flat, I wanted a super cool wall clock - fun, creative and big. Unfortunately, the ones I liked were out of my budget. Then the idea started - I'll make my own!

I went home, decided where I want to put my wall clock and looked at the stuff I can use. I've always liked the idea of those modern clocks with  pieces that go directly on the wall. I went online and found how others do it and apparently, there are kits you can buy and all you have to do is attach it - but where's the fun in that? 
My wall clock is made of air dry clay, an Ikea clock mechanism and velcro tapes
At the time, I was experimenting with air dry clay, I had a pack I picked up at the art store (also available in groceries and school supply stores) for only AED12. The clay presented limitless ideas - I can create any characters for my "numbers". Finally, I settled only four characters to represent: 12, 3, 6 and 9. As you can see in the picture above, 12 and 6 are actual numbers and 3 is a bird and 9 is a weird face. 


Here's what you need:

1. Air dry clay (or oven-baked polymer clay, it's really up to you). You can also use styro or felt pieces from your kids' unused toys (or buy new). 

Air dry clay for AED12


Considered using this bunny head too

    Other ideas:
    - old plastic domino pieces
    - number blocks (the light ones) 
    - photos on foamboards (light and cute)
    - big, lightweight metal numbers you can buy at craft shops


2. Paint if you're using clay.

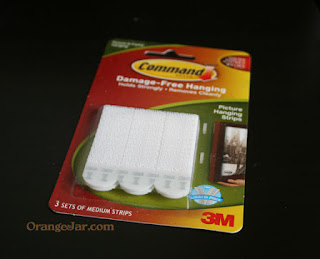
3. Velcro picture-hanging strips (found mine at Ace Hardware) - I think this is genius! By using these velcro strips, you can change the designs anytime you want. You can also change the batteries of your wall clock without damaging your design or wall. 


Here's what you need to do:

1. Decide the numbers you want to put up - you can do it like mine, just four pieces or put all numbers in. 

2. If you're making clay pieces, just be sure they are light enough so that they don't fall. Your velcro strips will tell you up to how much weight it can hold, but because your pieces will be smaller, you'll also have to cut it to fit. Paint your clay pieces and let them dry. If you're using other materials, clean them and make sure they do not have lint or other things sticking to them that may make the velcro tape loosen it's hold.

3. Get a ruler and pencil, and mark the spots you want to put the pieces on. I measured the width of my space and marked the center. Then I measured from the center to where I want to put the "numbers" and made sure that they were even. Mark it with small pencil lines. 

4. If you're going for other materials like felt or plastic numbers then they are pretty much ready to use. So just cut your velcro strips to fit at the back. Follow the instructions on putting it up, specially cleaning the surface (both on your piece and the wall) before you attach. This will ensure that it stays on. 

5. Attach your center piece or clock mechanism. I got mine from an Ikea wall clock, the center was black so I just painted it over with white paint using floral patterns. Then attach the "numbers". Be sure to follow your pencil marks.

And there you go. A wall unique wall clock that you can proudly say, only you have. My wall clock has been up there for over a year, have changed batteries twice and have removed the pieces several times to show friends and it's still up and working. 

Let me know if you try this and how it turned out.


Wednesday, 27 June 2012

Reusing Tin cans


The love of my life is also in love with cookies so we have an accumulating number of tin cans in the house. I loathe to throw these away because firstly, I love tin cans and secondly, they are great containers for small stuff. And since I've started crafting, they have been really nifty for keeping cut paper pieces, short wire ends, tools and more. 

However, I do not like the designs of these contemporary tin cans. So when I finally got the time, I hopped over Ace Hardware and got  a bottle of spray paint useable for metal for about 20aed or so. There are many colors available but I chose this lovely chocolate brown.


I live in a one bedroom apartment so I had to layer my tiled floor with tons of newspaper. Unfortunately, some paint still got in between the cracks. No worries though, a rag wet with white spirits helped me clean it off (fortunately too because I got some paint on a white leatherette foot stool - whew!). So, if you're doing this in an enclosed space, make sure things are properly covered, your windows are wide open (to let the fumes out) and if you have exhaust, you might as well open them. Better yet, do it outdoors if you can.

Before you start spraying, make sure your tin can is clean. I washed all my tin cans with soap and water and dried them with a clean rag before storing them. So before I sprayed it, I only quickly wiped it with a rag wet with alcohol and again let it dry first.

Spraying can be tricky but easy enough to do well with practice. My bottle of paint recommended spraying from 6-8 inches away, which I did until the can was evenly covered. Don't spray too much though or the paint will accumulate in an area and start to drip (my first can has several drips on one side).


Let it dry then spray another coat. Make sure to get in those grooves around the sides. 

It's not perfect but I have plenty more to practice on. Next time, I'll grab another color that will go with chocolate brown and stencil in a few designs or patterns. Good thing I've got plenty of tins to work on.


But even without extra design, this tin will look great on my craft shelf or as a gift box.

Saturday, 20 March 2010

Celebrities donate crafts for a cause

Just got this link from Neil Gaiman's twit - celebrities donate crafts for a cause (proceeds benefit the victims in Haiti) and the products are all up for bidding here.


"Famed author, Neil Gaiman (Coraline, The Sandman, Stardust, The Graveyard,), decorates a few 4-panel postcards and some of his “Scary Trousers” t-shirts for the Crafts For A Cause auction, which begins March 15th at 8am, here: biddingforgood.com/craftsforacause". - Crafts for a Cause (photo by Cat Mihos, also taken from the same site)

Check it out, you might get lucky and get creative works by Neil Young, Christina Aguilera, Kings of Leon and more, and for a good cause too!

Friday, 7 August 2009

Crafts 101: Recycled Boxes


This beautiful Friday evening we set out on a quest - to create our very own beautifully recycled boxes.

(With the economic crunch, we'd rather not spend on those beautiful yet pricey boxes we can buy at the stores. Plus, we'll be helping save the environment too!)

My little helpers - Tin, Tel, Ice and Kit - all had a goal of their own. Tin wanted a box for her knickknacks, Tel wanted a jewelery box, Ice wanted a box for his photo collection and Kit wanted a dragon, which we'll talk about in a later project.

The only rule is: we can only use whatever we find in the house which we didn't need anymore.


Generally, what you would need for this project are:
1. Boxes - you can use almost any box. For example: tissue box, shoe box, laundry detergent box, boxes of shampoos and soaps, boxes of gadgets and a lot more. Most of these boxes we just throw away anyway but there are some good ones which just need a little prettying up.
2. Paper for the cover - again, you can use almost any paper. Leftover gift wrappers, paper bags, magazines, newspapers, old comics, drawings, photos, etc.
3. Glue or paste - the dry sticky kind is better so that it does not soak through the paper and end up crumpling it.
4. Scissors - if children are doing the project, please make sure adults are with you to supervise.
5. Colors - depending on your design, you may need to color so pencil colors or watercolor may come in handy.

With creative hands at hand, we set to work.

Lavender Delight
1. In this box, we used a Hallmark paper bag which was used to package some postcards we bought recently. Cut the paper bag into strips to make it easier to attach to the box. Here, we kept all the pretty lavender parts and all the white parts. The paper was a thin one, so we needed to apply two layers on the box to hide the original text.

2. We used the white strips from the paper bag as a first layer by spreading glue all over the box. Then we smoothed out the strips over it.

*If your cover is thick enough to hide any original text or design on the box, then one layer is enough.

3. Make sure that a little part of the paper strip overlap on the edges. You can then fold this over to the other side to make the edges look neat and tidy. Let it dry.

4. Once dry, apply another layer of glue or paste. Using the lavender strips, slowly and carefully put it over the glue. Use your palms to smooth over any creases and don't forget to let the strip go over the edge for a nice finish.

*Make sure you do this to all the sides.

Trinket Keeper
1. On a used white folder, we traced these two patterns to create our own box.

*If you want to make your own box, follow this guide: dark pink broken lines are for folding; the blue broken lines are for cutting.

2. After cutting and folding out the pattern, you can design the outer side. You can paste strips of paper on it or as Tel decided, color the box with her favorite colors.

*This is not shown in the photos, but after she finished coloring, Tel lined the inside of the box with cotton from an old jewelery box and sprayed it with cologne to make it smell nice.

Art explosion
1. Ic and Tin decided to cut out colorful pictures from 2004 magazines which they were told to throw away.

2. Put glue at the back of the cut outs.

3. Carefully smooth out the cutouts over your box.

There are many possibilities. It's all up to you to decide.

Hope you have fun like we did!

*You can play around with this by pasting your favorite pictures all over the box. You can choose words which you like as Tin did. You can compose messages using different word cutouts. You can color it or paste flowers, shells or other decorative items on the cover.

Friday, 31 July 2009

Welcome

Welcome to the long-overdue OrangeJar blog.

This blog will be a supplement to our website OrangeJar.com. Here, we will post art-related events within the UAE, art projects for kids and adults alike and just talk about art and related topics in general.

Enjoy the journey with us - let's colour up this virtual world!