Cleaning up my hd is so harrrd to do... (can you hear a tune with that?). While I'm waiting for the trash to empty, I'm reorganizing and sorting my folders. Got reminded of this mini tutorial I wanted to post a while back - cool wall clocks!
When I moved to a new flat, I wanted a super cool wall clock - fun, creative and big. Unfortunately, the ones I liked were out of my budget. Then the idea started - I'll make my own!
I went home, decided where I want to put my wall clock and looked at the stuff I can use. I've always liked the idea of those modern clocks with pieces that go directly on the wall. I went online and found how others do it and apparently, there are kits you can buy and all you have to do is attach it - but where's the fun in that?
I went home, decided where I want to put my wall clock and looked at the stuff I can use. I've always liked the idea of those modern clocks with pieces that go directly on the wall. I went online and found how others do it and apparently, there are kits you can buy and all you have to do is attach it - but where's the fun in that?
 |
| My wall clock is made of air dry clay, an Ikea clock mechanism and velcro tapes |
At the time, I was experimenting with air dry clay, I had a pack I picked up at the art store (also available in groceries and school supply stores) for only AED12. The clay presented limitless ideas - I can create any characters for my "numbers". Finally, I settled only four characters to represent: 12, 3, 6 and 9. As you can see in the picture above, 12 and 6 are actual numbers and 3 is a bird and 9 is a weird face.
Here's what you need:
1. Air dry clay (or oven-baked polymer clay, it's really up to you). You can also use styro or felt pieces from your kids' unused toys (or buy new).
 |
| Air dry clay for AED12 |
 |
| Considered using this bunny head too |
Other ideas:
- old plastic domino pieces
- number blocks (the light ones)
- photos on foamboards (light and cute)
- big, lightweight metal numbers you can buy at craft shops
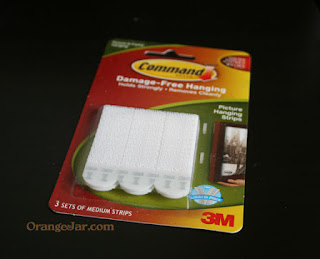
3. Velcro picture-hanging strips (found mine at Ace Hardware) - I think this is genius! By using these velcro strips, you can change the designs anytime you want. You can also change the batteries of your wall clock without damaging your design or wall.
Here's what you need to do:
1. Decide the numbers you want to put up - you can do it like mine, just four pieces or put all numbers in.
2. If you're making clay pieces, just be sure they are light enough so that they don't fall. Your velcro strips will tell you up to how much weight it can hold, but because your pieces will be smaller, you'll also have to cut it to fit. Paint your clay pieces and let them dry. If you're using other materials, clean them and make sure they do not have lint or other things sticking to them that may make the velcro tape loosen it's hold.
3. Get a ruler and pencil, and mark the spots you want to put the pieces on. I measured the width of my space and marked the center. Then I measured from the center to where I want to put the "numbers" and made sure that they were even. Mark it with small pencil lines.
4. If you're going for other materials like felt or plastic numbers then they are pretty much ready to use. So just cut your velcro strips to fit at the back. Follow the instructions on putting it up, specially cleaning the surface (both on your piece and the wall) before you attach. This will ensure that it stays on.
5. Attach your center piece or clock mechanism. I got mine from an Ikea wall clock, the center was black so I just painted it over with white paint using floral patterns. Then attach the "numbers". Be sure to follow your pencil marks.
And there you go. A wall unique wall clock that you can proudly say, only you have. My wall clock has been up there for over a year, have changed batteries twice and have removed the pieces several times to show friends and it's still up and working.
Let me know if you try this and how it turned out.


No comments:
Post a Comment